Sunday, February 15, 2015

SANS DFIR Challenge Results (2014): My Methodolgy

As part of continuing education and the personal need to validate that my skills are polished, I routinely enjoy working on Digital Forensics and Incident Response challenges. I plan to start adding additional challenges to my blog going forward.


Recently, I caught wind of the Digital Forensics and Incident Response Monterey Network Forensics Challenge. SANS does a good job at creating these challenges and make the publicly available and free. This particular network forensics challenge consisted of 6 questions that required the analysis of the following data types:raw log data, flow data, and network traces. Besides having been really busy at work and at home lately, I decided to create a goal of making this challenge as close to a real life experience as possible. So I decided to get to the answers, however that may be, as quickly and efficiently as possible, somewhat simulating how incidents may transpond while on the job. On a personal note, I completed all 6 questions in less than 2 hours (minus the bonus question).


Question 1
Difficulty: Easy
Evidence: SWT-syslog_messages
Question: At what time (UTC, including year) did the portscanning activity from IP address 123.150.207.231 start?

Based off of the data provided in the question, what I did to identify when the port scanning started was to simply identify the first packet that 123.150.207.231 sent.


Now that we have the log entry that shows the first packet that was sent, lets attempt to infer the timezone that the system recorded log entries in. This can be possible by looking at the real time clock entry (aka RTC, CMOS clock, or Hardware clock) in this log file and comparing it to the log entry timestamp. The first highlighted timestamp is the systems local time for that log entry and the second highlighted timestamp is the cmos clock time, which calls out the timezone it’s running in. In our case, it says UTC.


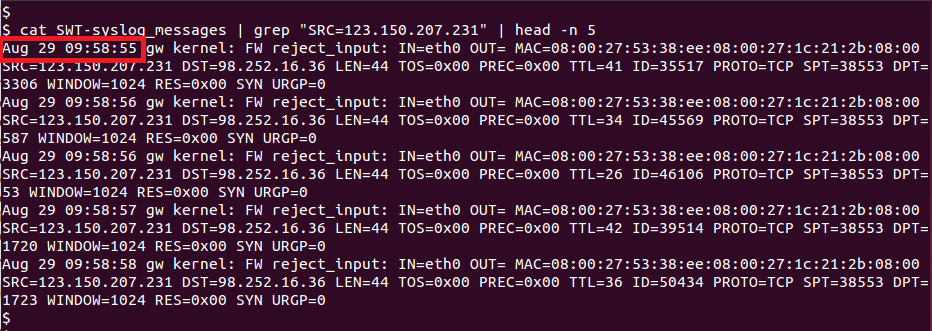
Answer: 13:58:55 UTC, 2013 (09:58:55 ET, 2013)


Question 2
Difficulty: Easy
Evidence: nitroba.pcap
Question: What IP addresses were used by the system claiming the MAC Address 00:1f:f3:5a:77:9b?

The answer was simple to obtain, assuming you understand the basics of ARP. I'm a big fan of tshark, so I used tshark to obtain all of the IPs that this MAC address claimed in the log data provided.
 

Answer: 169.254.90.183, 169.254.20.167, and 192.168.1.64

Question 3
Difficulty: Medium
Evidence: ftp-example.pcap
Question: What IP (source and destination) and TCP ports (source and destination) are used to transfer the "scenery-backgrounds-6.0.0-1.el6.noarch.rpm" file?

To obtain the source and destination IP’s and ports that were involved in transferring the file "scenery-backgrounds-6.0.0-1.el6.noarch.rpm", a very simple and quick filter showed the relevant data we were looking for.


I’m not going to use this blog post to explain FTP and the the Active/Passive modes. I’ll leave that up to the reader to understand why high ports from server to client are transferring the file...
Answer: Data is transferred from 149.20.20.135:30472 to 192.168.75.29:51851


Question 4
Difficult: Medium
Evidence: nfcapd.201405230000 (requires nfdump v1.6.12. Note that nfcapd.201405230000.txt is the same data in nfdump's "long" output format.)
Question: How many IP addresses attempted to connect to destination IP address 63.141.241.10 on the default SSH port?

I utilized a few Linux utilities to extract the total count of IPs that attempted connections to 63.141.241.10 on destination port 22 (SSH). I made the decision not to extract IPs that made full connections (think TCP 3-way handshake). Instead, IPs were identified by having sent any packets to the destination IP, regardless of what flags were set and what order they were received. On a personal note, I was excited to see flow data used in this challenge. I can’t express enough how valuable flow data is to the incident responder and network security analyst.


An explanation of the below command is as follows: awk is used to identify the lines that match the destination IP/port, removes some unneeded data in that line, prints out the scanning IPs, removes duplicate IPs, and then prints out the count of unique IPs that sent at least one recorded packet to the destination/port combo.


Answer: 49


Question 5
Difficulty: Hard
Evidence: stark-20120403-full-smb_smb2.pcap
Question: What is the byte size for the file named "Researched Sub-Atomic Particles.xlsx"?

This first screenshot shows the FIND_FIRST2 subcommand within the smb protocol. This command is used to search for files in a directory. Keep in mind that this subcommand does not mean a file was actually transferred. I used it to identify the file size of the file "Researched Sub-Atomic Particles.xlsx" from the file listing.


Now since we see the file listing, we can expand out the information fields and use the “end of file” attribute to identify the byte size of the file.


Answer: 13625 bytes


Question 6
Difficulty: Very Hard
Evidence: snort.log.1340504390.pcap
Question: The traffic in this Snort IDS pcap log contains traffic that is suspected to be a malware beaconing. Identify the substring and offset for a common substring that would support a unique Indicator Of Compromise for this activity.

This one was really fun.


To start off, I randomly pulled a few streams out of this packet capture to see what I was dealing with. I initially noticed the data section of each stream had some similarities, including the same data segment size (32 bytes) for each. The below tshark command was used to extract the raw data out of each stream.


The goal of this question is to identify the substring that can be used as a unique identifier, or IOC (Indicator Of Compromise). I performed the identification of this unique substring by visually identifying the pattern "554c51454e5032" (ULQENP2) in every streams data segment. It didn't take long as a simple scroll through the log entries displays the unchanging string. Yes, this was that simple, but keep in mind that in the real world if you didn't know this data was malicious traffic in the first place, it most definitely would not have been that easy. Also, if these beacons were sparsely mixed in with other traffic, it would've taken more work and time to isolate this traffic and identify the unique IOC.


A snort signature could easily be created on this unique substring (and offset) and should provide pretty high fidelity.
As an additional challenge to myself (after I initially completed this challenge), I wrote a script that performs pattern matching of raw data from streams that attempts to identify patterns with actually providing a pattern to match on. I wrote it based solely off of this data and it works for this data. I haven't been able to thoroughly test it on enough data sets to feel comfortable with sharing just yet.
Answer: ULQENP2 (ASCII) 554c51454e5032 (hex) and bytes 5 through 11


Bonus Question: Identify the meaning of the bytes that precede the substring above.


Convert first 4 bytes of the 32 byte long data section from hex to decimal. This converts as a UNIX timestamp.
0x4fe6c274 (hex) → 1340523124 (decimal) → Sun, 24 Jun 2012 07:32:04 GMT(UNIX timestamp)

Sunday, April 20, 2014

Optimizing System Performance for Analysis

For some folks, this blog post may be fairly rudimentary, but I find myself using the below techniques quite often to analyze large chunks of data. In my post I’ll go over 2 short scenarios that require analysis of a large amount of data.

Scenario #1

Recently I had a need to search for a needle in what seemed to be multiple haystacks. I was provided approximately 100GB of packet capture (pcap) files in which I was told to essentially look for badness. I’m not going to explain my complete methodology of attacking this massive task, but instead I'm going explain my simple and repeatable approach to making searching large chunks of data somewhat bearable. I need to preface that I did not have access to any COTS full packet capture devices or indexing tools/services. I also didn’t have the time to learn how to install, configure, use, and validate free and open source software (FOSS) such as OpenFPC or Moloch.
One of the many investigative actions that I performed was obtaining all of the dns requests from every pcap file. Have you ever tried opening a 4GB pcap in wireshark on a system that only had 4GB of RAM? Good thing the linux server that I had access to use had 24GB of RAM, 8 CPU's/cores, and multiple non-RAIDed hard drives. The 100GB of pcaps were split in approximately 4GB chunks, which was a big time saver as I didn’t have to split huge pcap files into smaller ones. If you have a need to do this, I’d recommend looking at a tool such as editcap. Since I am a big proponent  of automation, I opted not to use the “gui” wireshark tool. Instead, I used the terminal version of wireshark, called tshark. Using the command line tool would allow me to iterate through all of the pcap files in an automated fashion.

Below is a quick tshark command to extract dns requests from a single pcap file.

# tshark -r file1.pcap udp.port eq 53 >> file1.dns

Below is how you could iterate through all of the pcap files in the current directory.

# for f in `ls *.pcap`; do tshark -r $f udp.port eq 53 >> $f.dns; done

Run this command and take a look at your system resources. You’ll notice that only one of the CPU’s/cores is being utilized. So here’s how you fix the issue of only using 1 core...

# ls *.pcap | parallel --gnu -j 6 ‘tshark -r {} udp.port eq 53 >> {}.dns`

The above command essentially kicks off 6 instances or processes of the tshark command against 6 different pcap files simultaneously. As tshark finishes the filter on one pcap file, the next pcap file queued up will spawn a new process. This will utilize 6 of the 8 cores (instead of 1) of the machine I'm using until all pcap files have been processed.

Using the parallel command will drastically speed up the searching of the pcap files.

Scenario #2

For the second example scenario, I was provided a single 10GB text based log file that would need to be repeatedly searched. Again, I had access to the same linux server as listed earlier. As hinted to above, working with very large files is tough, especially when you're looking to obtain as many efficiencies as possible while searching data. For this scenario I performed two up front actions that would later allow for repeated searching to be far more faster.

Action #1: There is currently 16GB of RAM free on my linux system. In attempts to not have the hard disk on this system be the bottleneck for every search I run, I decided to create a ramdisk. A ramdisk is essentially a chunk of RAM allocated to hold data that the user can directly read/write, allowing reading and writing of data to occur only in RAM, vastly speeding up analysis of this data as the hard drive is taken out of the equation.

Below are the steps I took in creating a ramdisk:

Use the “free” utility to see how much RAM you have available so you know how much RAM you can allocate.

# free -g
# mkdir /tmp/ramdisk
# chmod 777 /tmp/ramdisk
# mount -t tmpfs -o size=16GB tmpfs /tmp/ramdisk/

Action #2: Having one large file will essentially allow us to use 1 CPU/core on the system to search data. So as mentioned earlier, lets split this large file up into smaller, more manageable files so we can utilize the additional cores on this system for analysis. Since I had a single 10GB file and I wanted to utilize 6 cores to process this data, I decided to split this 1 file up into 18 separate, smaller, and more manageable files. Here’s the command below.

# split --bytes=596523236 bigfile.log

Now all you need to do is move all of the files to the ramdisk for searching. The ramdisk can be treated just like any folder on the filesystem, so a simple "cp" command of the newly created files to this new ramdisk folder works just fine.

Just as we've done above, you can now use a quick loop and the parallel utility to iterate through all of the split files and use multiple cores to search through this data. The additional speed of utilizing multiple cores and RAM for processing data will be well worth the time it took to setup.

I hope you found these quick tips useful as I tend to rely on them quite often.

Wednesday, January 22, 2014

An iFrame HTML Obfuscation Flavor

I was given an HTML file to look at the other day. It was believed to be redirecting clients to a malicious domain. The file was moved into my Linux based sandbox for analysis and I noticed that two of my favorite tools of choice to start analysis with (grep and less) were not able to display text within this HTML file (first picture below). The next logical step was to check the file type (second picture below):


Notice that the file command claims that this is a UTF-16 encoded file. After some quick research, it turns out that the grep (standard build on a Ubuntu install) utility does not support UTF-16 encoded data.
Below is a utility (iconv) that can be used to convert the file from UTF-16 to UTF-8. Keep in mind that grep can, by default, read UTF-8 encoded data.


Now you can simply view the file with most linux command line tools that support UTF-8 data encoding. Just in case you were wondering a little about UTF-8... UTF-8 is backwards compatible with ASCII, which means that nearly all text editors support UTF-8 encoding.
Now that I can easily view the file with my tools of choice, I plan to search for any redirect functionality, such as meta refresh, server redirect, JavaScript, iframes, etc. to identify how users were navigating to another domain from this page. There are a couple of iframes in the HTML code and one of them stood out. Here's a snip it of this code:
Do you see any type of encoding in the screen-shot (hint: look for patterns)? There is decimal encoded HTML as part of the contents of that iframe. This encoding may be to deter simple static string analysis, among other things. The below picture shows what the characters after the "src=" are after converting them to ASCII with a python script that I wrote.
Below is a screen-shot of the decoded iframe:
This specific example is fairly unique as it used decimal HTML encoding and once the decimal encoded characters are decoded to ASCII text, the text that displays is a "bit.ly" address (yet another obfuscation layer). Once you navigated to that "bit.ly" address and made it to the final domain, you most likely will have been served something malicious. I threw that domain into VirusTotal and at the time of my analysis, the detection ratio 3 of 51 indicated that this domain could very well be malicious.
Below is a quick regular expression that could be used to identify iframes that contain decimal encoded data. Please note that there are *many* obfuscation possibilities that could bypass this regular expression. My intent was to not provide an exhaustive detection signature, but instead show you a simple yet unique way of bypassing detection mechanism's in the enterprise, and then detecting it.
iframe src="(&#\d{2,3}){3,}

Monday, December 2, 2013

Detections for MS Office Packaged CVE-2013-3906 Before 0-Day?

I know, you’re waiting anxiously to read the next part of the “Advanced Enterprise Detection Capabilities” mini series... This post is going to be a quick deviation (although somewhat related as the topic is about a specific detection capability) as timing is semi relevant. Don’t worry though, I will continue the exciting series after this quick post.


This post is going to be a quick and dirty “Did You Know” [you had detections for the MS Office XML format packaged TIFF exploit before the exploit ever left the authors mailbox]? Very few, if any, antivirus solutions (at least that I know of) had detections for the MS Office XML format (Office version 2007 and newer formatted files) packaged exploit. I have a couple of variants that were all ‘detected’ with this tool. So you ask, “How did I already have detections?” Well, there is this tool called OfficeMalScanner written by Frank Boldewin. This tool was initially written to parse MS Office OLE format (Office version 2003 and older formatted files) files to scan for malicious traces, like shellcode heuristics, PE files or embedded OLE streams. One of the lesser known or used capabilities of this tool is the signature detection capabilities of binary and PE files. So let's learn a little bit about it.

Below are the quick steps I went through that allowed me to detect or identify a file that (after additional in depth analysis) was malicious (realizing that AV software did not detect this file as malicious). It’s important to note that I am not going to analyze the shellcode or the exploit details, but instead, identify the detection that OfficeMalScanner alerted on with this file.

The file that we will analyze with OfficeMalScanner is a Microsoft Office XML (.docx) formatted document exploiting CVE-2013-3906. The filename is "IMEI.docx" with an MD5 hash of b44359628d7b03b68b41b4536314083.


The first command you run when looking at an MS Office file:

$ wine OfficeMalScanner.exe IMEI.docx scan


Next, lets inflate (unzip) the file:


$ wine OfficeMalScanner.exe IMEI.docx inflate

Notice that the tool identified at least 1 “.bin” file. Lets run the tool against this binary file (which in our case is in the activeX folder) by running the below command:


$ wine OfficeMalScanner.exe activex.bin scan brute
       
Notice that all of the found signatures start with “FS:[30] (Method 4) ...” This is a code signature that attempts to locate EIP (a technique that shellcode attempts to use to figure out the effective address when loaded into memory). OfficeMalScanner doesn’t detect the actual vulnerability that exists with the rendering of the TIFF file.  It actually detects the heap-spray shellcode embedded in the ActiveX file. So in a non-direct way, OfficeMalScanner would have identified this document as malicious.

A useful built in capability of OfficeMalScanner is that it provides a malicious index rating. This is based off of the types of detections that the tool alerted on. The higher the number, the higher probability that the file is malicious. I want you to realize that I am using this tool as a detection capability, not an analysis capability. The fact that the tool displays that the file seems to be malicious should be identified as an “indicator” that the file “could” be malicious. When an index threshold is met (you need to do some testing to see what makes sense in your environment), the analyst should then know that the file requires additional in depth analysis. This method could be used as an alerting mechanism that attempts to weed out possibly malicious files from non malicious files. For purposes of this post, I am not going to provide my analysis of this shellcode or the entire staged exploit process. [I promise to have future posts that provide this type detail.]

OfficeMalScanner is a very effective tool at identifying malicious data within the older OLE Office format and also, as we’ve just learned, at detecting malicious traces within binary or activeX files. As an added capability to your enterprise, I would recommend that you automate the scanning of all MS Office email attachments with OfficeMalScanner (at the very least). To do this, there are two potential tasks that would need to be engineered. The first task would involve identifying a way of getting all MS Office files in a place to be scanned by OfficeMalScanner (in an automated fashion). (Note from the author: OfficeMalScanner is written in C and could potentially be exploited: Run this tool in a secure/safe environment.) The second task that would be required includes creating a “wrapper” for OfficeMalScanner that would allow you to perform all of the above commands that I manually typed out to be executed automatically against every MS Office file (XML and OLE formats) and all embedded binary or office files within.

Monday, November 18, 2013

Advanced Enterprise Detection Capabilities (a multipart series)

I'd like to introduce a few concepts that can and *should* be used to augment your current enterprise detection capabilities. This series will not go over standard concepts that enterprises commonly deploy such as firewalls, IDS, proxies, host based AV, etc. These new concepts aren’t anything ground breaking, but they are, however, not too commonly thought of or implemented in the enterprise security stack.

“Part 1: Enterprise Wide Multi-AV Scanning? Well, Kind Of…"
The first concept that I am going to talk about is meant to augment your enterprises’ simple anti-virus (AV) products. In most enterprises, AV scanning technology may be implemented by network devices (web proxy or next generation firewall) and clients/endpoints (think Forefront Endpoint Protection, McAfee Endpoint Protection Suite, ClamAV, etc.). Lets not forget that AV software can also live on servers that offer network services, such as (and not limited to) mail servers (scanning all email attachments), sharepoint servers (scanning all files uploaded to sharepoint), etc.
In simplistic terms, most AV solutions work by either identifying known bad data (a sequence of bytes or code blocks) within a file or by using some form of heuristics on/against a file. The actual file (data) is needed to be scanned and sometimes not even the whole file needs to be scanned by the AV software. The concept that I am about to explain doesn’t actually scan any data within any file (at least not at this moment in time).
The concept is rather simple: Obtain a hash of a file and use that hash to identify other files (presumably malicious) of the same hash. There are online sources, such as Virustotal (VT), that allows you to submit/upload a suspected malicious file and have 40+ different AV packages scan that file for you. Quick note: VT also provides other useful analysis capabilities outside of just simple AV scanning, but most of these other capabilities will be out of scope for this concept. However, a VT capability that is in scope for this concept provides the ability to perform simple searches of the VT database (for free with limitations). This ability allows you to search the VT database with a hash of a file (MD5, SHA1, or 256) and outputs scan results of a previously scanned file with the same hash (see picture below). Keep in mind that for results to be displayed, a file with the same hash had to be uploaded to VT for scanning prior to your search.


I must speak real quickly to the effectiveness of AV in general. All AV solutions will not detect the same malicious files. To provide additional details on this, I recommend reading a report such as (http://www.mcafee.com/us/resources/reports/rp-nss-labs-corporate-exploit-protection.pdf) or you could even just reference the above picture as you'll notice some AV products detected a specific file as malicious while others did not. Another controversy regarding AV is that it is a failing detection capability (http://www.imperva.com/docs/HII_Assessing_the_Effectiveness_of_Antivirus_Solutions.pdf). I will have to agree to an extent in regards to AV's overall effectiveness, but use cases exist (such as the one I am currently speaking to) that encourage us to use the "collective" of AV products as an additional effective source of detection data. Most enterprises will use 1 or 2, maybe even 3 separate AV solutions within their enterprise. The old adage of “two heads are better than one” holds true with having more than one AV solution (to an extent). Having 40+ AV products scan a file raises the odds of a malicious file being detected.
I need to [re]iterate that this isn't an "end all be all" solution as you will only be submitting the hash of a file. If the file is modified in any way, and I mean *any* way, the hash will be different, thus the results may not be favorable. Again, this isn’t an absolute solution, its a gap filler to augment your current enterprise detection capabilities.
Below is a limited set of data points to keep in mind when utilizing a concept that only uses the hash of a file as a detection mechanism.
  • A file with the same hash had to have been uploaded to VT for analysis.
  • Hash lookups are much faster than uploading the actual file for full scanning.
  • The full file being uploaded provides a more accurate analysis.
  • No proprietary, personal, or sensitive data is ever sent to VT.
    • Subscribing to VT Intelligence allows users to download files that have been uploaded for analysis.
  • Using ONLY the hash as a piece of data to perform a lookup against does not help to  contribute to the security community.
  • Free VT service has a limited for uses (searches/uploads) per IP per minute. An expansive pay service is available.
To finalize on this concept, you would want to automate this solution to reap all the possible benefits of this concept. As a recommendation, I would first target automating email attachment hash lookups as there will be many obstacles to overcome (ex. identifying types of files that you want hashed, how to obtain the hashes, writing custom software to perform the lookup, etc.). For brevity, I won’t go into detail on how this entire process could be architected from start to finish, but I will finish this post by mentioning some tools that could enable this concept to take shape.
  • VT API https://www.virustotal.com/en/documentation/public-api/ - Provides scripted access to searching the database by hash (among other things).
  • Bro IDS can be used to obtain hashes of files in near real time.
  • Most full packet capture solutions (ex. Solera, OpenFPC, Netwitness, etc.) provide API’s to allow packet data extraction, thus allowing a separate tool to perform data carving and hash calculations.
  • Vortex IDS - Have pcap data sent directly to a Vortex IDS instance and hash the relevant streams (saved as files).

Wednesday, October 23, 2013

The Lesser Known 'Epoch'-ness Monster

Have you ever heard of or dealt with UNIX Epoch (also known as POSIX) time? Ok, so maybe I’m not talking about a monster, but an information technology system for describing time. I’m not planning to retype what UNIX epoch represents, so I’ll send you to this wiki page Unix Epoch. (Here you can read a good explanation and history behind it.) However, I will speak to how you could encounter this time encoding/format in the incident response and digital forensics fields as well as providing a simple solution to a small nuisance that I recently came across.

Throughout an infosec professionals’ career, there are many situations in which one may come across an epoch timestamp. Here’s a couple examples:
  • Viewing packet capture files using tools such as tcpdump and tshark. By default, tcpdump and tshark will display the UNIX epoch time when capturing packets (on non-Windows machines)
  • MySql database analysis. MySql supports UNIX epoch time.
  • Squid proxy logs can be displayed in UNIX epoch time.
  • A lot of software running on a *NIX operating system will internally log time in UNIX epoch time, although some may display the time in a converted form by default. Essentially, analyzing data sourced from a linux, UNIX, or Mac OS X platform may be subject to displaying this time format to the analyst.

Recently, I was provided a csv log file to analyze. Below is a file I generated to provide a quick example.


Notice the first column… It contains a 32 bit integer that represents UNIX epoch time. This time representation is the amount of seconds since 01/01/1970 UTC/GMT. I don’t know about you, but there’s no way that I’m going to convert this time into a format that makes sense to me in my head. Back to the log file… There were thousands of lines in this log file so using an online utility such as http://www.onlineconversion.com/unix_time.htm to convert each timestamp manually would not be practical. Three initial solutions came to mind during the brainstorming process.

Possible Solution #1
The first possible solution deals with doing the calculations to determine how many seconds/hrs/days/years the 32 bit integer represents. I most likely would need to determine how many days/hours/seconds existed in each year, while realizing caveats such as leap seconds not being counted, etc. This could be done, but it would require a lot of time to write and then thoroughly test. After the calculations portion is vetted, I would need to append this timestamp to the original log file. This option will be a last resort if I can’t leverage and existing way of performing this action.

Possible Solution #2
The second possible solution includes writing a bash script that would grab the value of the first column of every line, post it to an online website that has already invested the time into performing the calculations, read and parse the results from the web page, and then copy that to a temp file to be appended to the original file. I realized that if I were to pursue this route, I could potentially DoS the website, especially if the log file had thousands of lines in it (I would need to create a single request for each line in repetition). This is not ideal and I would most likely not choose this option for such large conversions.

Possible Solution #3
The third solution that came to mind includes writing a script to convert each epoch date per line and then writing this to a new file. This solution would use a cool feature of the “coreutils” suite of tools. Specifically, the little known use of the “@” switch within the coreutils “date” command. Note that the version of coreutils that this was tested on was ‘GNU coreutils v8.13’. Another note: To determine the version of coreutils that your *NIX system is running, just execute any of the coreutils applications with the switch “--version”.

$ date --version
date (GNU coreutils) 8.13.

Needless to say, this is the solution that I chose to pursue.

Below is the command that performs the conversion from UNIX epoch time to an output that is easily understood by analysts.

$ date -d @1382406394
Mon Oct 21 21:46:34 EDT 2013

Here’s the nifty little bash script that takes the first column from each line in the file, converts the UNIX epoch time to your systems current locale (utilizing the date command) and writes the new line to standard out, allowing you to save the output to a new file if desired. A little awk foo was leveraged as well...


This short article was written to provide an infosec analyst with a simple understanding of UNIX epoch time and it was also written to show a quick solution to a problem that I encountered. You never know what type of problems you will run into, so having an experienced set of problem solving skills is essential to an infosec professional.